A whole project completed! Well. It
is complete. Buuut I have plans for improving and expanding on it as is always the way.
So I have been a bit quiet on the blog for a while but I have been busy. My 28mm projects took a bit of a break as I got bitten by the bug to finish my 10mm second world war skirmish project.
The are all based for 1:1 skirmish (except in cases where it was impractical to base a weapon team seperately) and the board is a densely terrained 2x2" and I am using them with Nordic Weasel's 5 Men at Kursk rules which focus on very low level squad tactics. Ususally one squad and maybe a couple of support elements. My intention is to model the house to house fighting that occured on the edges of Kharkov during the 3rd Battle for Kharkov in 1943. One of the things I would like to add in the future is buildings that will allow me to represent the sort of buit up terrain in Kharkov proper. I have pushed some minis around and rolled some dice and I have found it a very easy ruleset to get to grips with. Hopefully I can get another live human opponent soon and I can have a go at writing up a Battle Report on here in the future. I'm hoping to have the rules down and a scenario sorted so that, all being well, I may run it as a participation game at next year's G3 game show. Before getting into the pictures a short note on accuracy: I tried to be accurate but where accuracy would have greatly slowed or stalled the project I did my best to carry on and not worry about it. As such the buildings aren't
quite 'right', and there are no doubt errors in uniform depiction. I am happy that everything is 'close enough' though, especially for the chaos of the Eastern Front.
First up here are the armies:

First the Soviets. Now tanks are not massively central in 5MaK but tanks you know? So I have rather more tanks than will see use in one battle. I also found the tanks a good stepping stone down to 10mm for getting my eye in on how to paint at that scale. The two T34-85's where the first that I painted. It was very educational, this was both my first time painting at this scale and my first time having a go at white wash camoflage. I wanted to have quite a stylised look to the whole project with the light/dark contrast emphasised. These first two tanks lack the level of contrast I wanted as I struggled to get a base green that was dark enough to achieve a satisfying contrast with the white wash paint and that wasn't too dark to compromise the scale effect. I am still happy with them but the T34-75 on the left is far closer to my intention. the infantry was tricky but very fun to paint. I leant heavily on washes to catch small details that my hand was not steady enough to get. I went for a solid base of rifleman and a decent selection of squad support attachments to allow me to change the OOB up a bit. I actually already have two field guns ready to paint that I lacked when {I started painting the Soviets so at some point those will be added in.

The Germans. This was my first time painting panzer grey and it was a little bit of a challenge to prevent the tanks from looking too 'flat'. I found that modulating between grey and brown filters gave them a more solid and lifelike look to my eye. The tank commanders for the panzer III and IV certainly helped too. I had to sculpt a rather rudimentary representation of winter overalls with some plastic putty onto them, though I am rather happy with the way they look. When it comes to uniforms I decided to go for a little bit of a mix, resulting in potentially questionable accuracy but I think the look is good. At any rate all the pictures I studied showed quite a wide variety of old and new kit and of troops with a mix of snow white and more temperate coloured gear, though there did seem to be a slight propensity to late issue field grey reversible uniforms. I was glad to find few enough examples of camoflage patterns that I felt no need to try to represent them in 10mm. Again I have far more tanks than I will field in one game of 5MaK but I
wanted to paint them and so I did! Also again I went for a solid base of rifles and a selection of support, this time with a field gun.
Now the board! I saw enough examples of open gabled roofs in pictures to feel ok about using these sorts of houses on the Eastern Front, though it seems that tiled roofs were very rare and metal, slatted roofing was the norm where thatch wasn't. Again I think these look ok but the roofs will probably be swapped out for metal looking ones in the future. I wanted the board to move from rubbled buildings to shelled but intact buildings to largley untouched to give some transitional, dynamic, visual interest as well as a variety of terrains to fight over despite the small area being fought over. To achieve this I set about my mdf buildints with a pair of old side cutters and a notched up scalpel blade.


I wanted modularity and so I made everything scatter terrain to be placed on a bare board that I sprayed grey/black, washed white, and then lightly sprayed again with a chocolate brown. the roads are simply plastic card (as is the basing for the buildings and scatter) with black mud texture paint sraped over the top. I may revisit the roads with some wet effects and puddles to give it a closer look to the slushy roads seen in pictures. The roads were metalled rather than packed dirt, it is just that the weather and heavy foot and vehicle traffic and rendered them a muddy, slushy morass, with the flat even road surface made visible beneath by passng vehicles. I simply cut a piece of packing plastic into a comb arrangement and used that to scrape the texture paint in the direction I wished the tracks to appear. Oh the telegraph poles are based on pennies rather than plastic card.


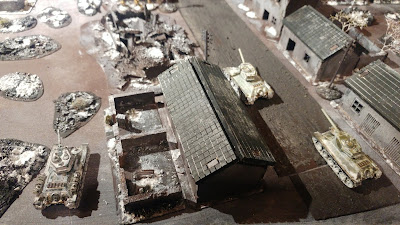
One issue I foresee for running the game at a show is that my stylised approach was maybe too succesful in that the models and terrain create such a coherent aesthetic, and the models are so small! that they can get a bit lost. I may place small removable colour flashes on the bases to remedy this. something like a small tag I can just stick to the bottom of the base that will stick out a little.
And there it is! the whole thing! I am extremely pleased with how this has all come together. When I started I did not know how I would achieve everything I wanted. I had a rather strong impression of the kind of feeling and aesthetic I wanted to evoke and started experimenting my way along. I learned a lot during this project. Anyway I hope you have enjoyed this post. Thanks for reading!
Products used (I'll edit if I miss things):
Pendrakken miniatures
Vallejo, paints and textures, snow texture
Mig paint
Serious Play, various bits of scatter materials some tufts, snow, and the seafoam came from them too
Candy Art Studio, snow (I used a lot of different snows!)
The buildings came form an Ebay Shop named banksjohnedward.